Apr 4, 2016 | 2016, Birthday, Blog Hops, Creative Circle |
It’s the 5th of the month – time for another Creative Circle Blog Hop! You may have hopped on over from Fran’s blog
, or perhaps you’re just joining us. Either way, I’m glad you’re here!
This month, we are showcasing Liz’ Perpetual Birthday Calendar. She’s nicknamed it #imbringingbirthdaysback in honor of the grass roots movement that Shannon West of Stampin’ Up! started. (If you’d like to know more about the movement, stop back in a day or two and I’ll explain…) For my version, I’ve used the color scheme of Blackberry Bliss, Bermuda Bay, and Delightful Dijon – all colors that are found in the patterns of the Bohemian DSP pack. I’ve paired my calendar with a suite of cards using the same color scheme and DSP pack and the Happy Birthday, Everyone stamp set. Here’s my ensemble:
The pattern for the calendar is probably one of my very favorite 3D items that we’ve played with to date! It’s got a lot of pieces, but it went together really easily. I just LOVE that it’s got a place in the back to store things like a set of cards, or perhaps a pad of paper and pen to keep near the phone.
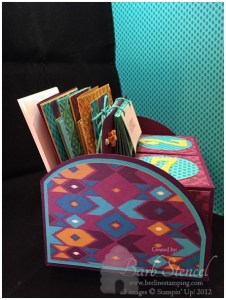

The pattern for this project can be found in Liz’ online store, and as with all her designs, it has a companion video showing you how to assemble your cut pieces. It’s offered in both an e-cutter format as well as .pdf. When you make your project, the first cube is numbered with 0, 1, 2, 3, 4, 5 and the second cube is numbered with 0, 1, 2, 6, 7, 8. Where’s the 9, you ask? You use the 6 and turn it upside down!
Time to send you off to see Sandy’s version of the calendar. Make sure you leave a comment – Sandy is going to be doing a random drawing for a free copy of the pattern! Thanks for visiting!


In case you get off-track, our hop this months is:
Sandy: http://www.thestampnscrapshop.blogspot.com
Liz: http://www.lizhollowaydesign.blogspot.com
Fran: http://www.fransabad.com
Barb: http://www.beelinestamping.com (you are here)
Apr 1, 2016 | 2016, Birthday, Blog Hops, Occasions Catalog |

Happy April Fool’s Day – thanks for hopping over from Di’s blog! Bet you thought we’d play a joke on you today. We thought about it, but then Connie suggested that we do a color challenge for this month’s blog hop and that seemed like a lot more fun. (Don’t worry – we’ll get you next year!) The colors we all worked with this time around are Melon Mambo, Crushed Curry, and Mint Macaron which are all found in the It’s My Party designer series paper stack from the Occasions Mini catalog.

I have to admit, I have a hard time making masculine cards. The It’s My Party suite of products in the Occasions Mini catalog has really simplified the process for me this year! Here’s one I whipped up for a couple of the special guys in my life. It starts out with a Basic Black base. Three strips of Washi Tape were added to a 4″ x 4 1/4″ square of the ‘Confetti’ DSP. I used the Lots of Labels Framelits to die cut a piece of Crushed Curry DSP from the It’s My Party pack and it is layered with another die cut piece of Whisper White. The greeting is from the Party With Cake stamp set and was done with Basic Black Archival Ink. It was accented with the Confetti stamp from that same set in Crushed Curry ink. The piece of Mint Macaron cake is a stamp from that set as well. You can’t see it, but the cake has a shimmer applied with the clear Wink of Stella Glitter Brush Pen. A pair of Rhinestones finished it all off!
 As cool as the front of the card is, the real star of the show is the inside! A strip of the black and white dotted DSP from the pack was die cut with the Party Pop-Up Thinlits die. I masked off the words and colored the piece with Crushed Curry and Mint Macaron Markers. The flames on the candles were done with the Gold Wink of Stella. Another bit of the Washi tape was used to accent the edges of the die-cut piece before it was adhered to the inside of the card. Makes a statement, eh?
Thank you so much for stopping in today. Now off you go to see Connie’s lovely project! Just in case you get lost, links to all the stops on the hop are:
Di http://www.stampingwithdi.com
Barb http://www.beelinestamping.com (You are here)
Connie http://www.texasschoolmarm.com
Mary http://www.doggandponyshow.blogspot.com

Mar 5, 2016 | 2016, Blog Hops, Creative Circle, Live Event, Occasions Catalog, Sale-A-Bration |

Welcome to the Creative Circle March Blog Hop. This month we are giving you a preview of The Garden – one of Liz’ most recent projects. If you’ve just come from her blog, you got a chance to see her lovely interpretation of the design. Because it’s so easy to resize cut files on my Silhouette, I decided to miniaturize it a bit and make a card-in-a-box!  My garden was primarily constructed with cardstock with a few bits of Botanical Gardens DSP used on the outside of the box (visible with flaps up) and the trellis. All the flowers were cut using the Botanical Builder Framelits Dies and cardstock (Basic Black, Hello Honey, Whisper White, Old Olive, and Mossy Meadow) the Happy Birthday greeting on the front was done with Teeny Tiny Wishes and the Word Window punch.
I made a couple of companion cards to go with the set – take a look:

Again, I relied heavily on cardstock for my basic color scheme and accented with die cut flowers and bits of Botanical Gardens DSP. The greetings used were from Birthday Blooms and Botanicals For You – a Sale-a-Bration set designed to coordinate with the Botanicals suite!
If you will be in Salt Lake City on Wednesday, April 13th, consider joining us for our live event at the Hilton Salt Lake City Center. You’ll get a pre-cut kit for The Garden 3D cardholder as well as 3 coordinating cards. You’ll also receive a download code for all the cut files, a video tutorial on it’s assembly, as well as unwatermarked, unrestricted, written tutorials for the cards we make at the event as well as 9 additional coordinating cards. To further entice you, here are a few teaser photos:


Thanks for hopping along with us – next up is Fran! Hope we get a chance to meet you in April…
The stops on the hop are:
Liz http://www.lizhollowaydesign.blogspot.com
Barb http://www.beelinestamping.com (you are here)
Fran http://www.fransabad.com
Sandy http://www.thescrapnstampshop.blogspot.com
Mar 2, 2016 | 2015, Blog Hops, Convention, Creative Circle, Live Event |
 Here is my latest work in progress. What am I making, you ask? I’ll give you a hint – I’m working with the Botanical Builder Framelits Dies and some of Liz Holloway’s cut files that we’ll be using in our Make The Rounds Event in April. Stop back on Saturday and take the Creative Circle Blog Hop to see my finished project(s)!
Want more info on Make The Rounds? See the sticky post at the top of this page…
Mar 1, 2016 | 2016, Blog Hops, Occasions Catalog |
 Thanks for hopping over from Di’s blog – this month we are ‘CASEing’ the Catty. CASE is an acronym for Copy And Share Everything, and I chose the Number of Years sample at the bottom of page 10 of the Occasions Mini catalog as my inspiration.
Actually, we worked with this set in my monthly Technique class this past week when we were studying dry-embossed ribbon. Here’s my favorite card from the class:
 We started with an 11 x 4 1/4″ card base of Whisper White thick cardstock and layered it with the pink striped DSP from the Birthday Bouquet pack. The top layer is regular Whisper White that measures 3 5/8 x 4″. Using the Number of Years Photopolymer set, we stamped the leaves twice in Old Olive and accented them with Blushing Bride, Rose Red, So Saffron and Pool Party flowers from the same set. The ‘Happy’, ‘th’, and {again} were all stamped in Pool Party, and the 29 was stamped in Crumb Cake on Whisper White cardstock. The banners and numbers were die cut using the coordinating Large Numbers Framelits die set. The numbers and banners were popped up with Dimensionals, and the card was accented with some (retired) Old Olive satin ribbon, Blushing Bride flowers punched with the Itty Bitty Accents Punch Pack, a bit of a Paper Doily, and some Pearls.
I love that the Number of Years set is so versatile and can be used for birthdays, anniversaries, milestones in school years to name a few. I’m also crazy about the font used in the set – so sweet! The stamp set and coordinating Large Numbers Framelit dies come as a bundle as well and will bring you to within 75 cents of a Sale-A-Bration award! Doesn’t get much better than that…
Thank you so much for stopping by today – now it’s time to send you off to see what Kathya has worked with.

Our hoppers this month are:
Di http://www.stampingwithdi.com
Barb http://www.beelinestamping.com (You are here)
Kathya http://www.stampwithkathya.com
Crystal http://www.stampinonroodfarm.blogspot.com
Mary http://www.doggandponyshow.blogspot.com
Connie http://www.texasschoolmarm.com
Feb 5, 2016 | 2016, Blog Hops, Occasions Catalog, Valentines |
 Welcome to the Creative Circle Valentine’s Day blog hop! Did you see what Sandy had to show you – great stuff, eh?
I love making girly girl cards, and the Bloomin’ Love stamp set with matching Bloomin’ Heart Thinlits dies let me frill out to my heart’s content, and they are available as a discounted bundle! Here’s one of the cards we made in a recent class:
The Crumb Cake base was layered with a sheet from the Love Blossoms Designer Series Paper Stack. A Whisper White heart die cut was inlaid into the negative space of the top Blushing Bride layer. The greeting was stamped in Blushing Bride classic ink, punched out with the 2″ circle punch, and popped up with dimensionals. The flowers were cut with the thinlit set out of Blushing Bride Glimmer Paper and accented with pearls. The final accents at the bottom are a strip of the Blushing Bride Glimmer Paper and a ribbon/bow of Whisper White seam binding. Hearts and florals work together so well to make a lovely Valentine!
Wouldn’t this make a great card to add to the Mailbox from last month’s hop? Here’s the one I made:
 The pattern is available from Liz Holloway’s online store – you can get it here!
Thanks so much for stopping by today – next up is Liz and I know you’re going to love her project! If at any time you get lost, just click on one of these links to pick up where you left off.
1. Sandy Mott – http://thescrapnstampshop.blogspot.com/
2, Barb Stencel – https://beelinestamping.com/ (You’re here)
3. Liz Holloway – http://lizhollowaydesign.blogspot.ca
4. Fran Cassidy Sabad – http://fransabad.com/


